使用 GitHub Actions 自动部署 Hexo 博客
适用场景:Hexo 源码在私有仓库,部署目标是独立的公开
<username>.github.io仓库。 告别hexo d手动部署,推送文章即自动上线。
背景与方案说明
为什么不用 deploy-pages 官方 Action?
GitHub 官方推荐的 Pages 工作流(upload-pages-artifact + deploy-pages)是为**”当前仓库构建并发布当前仓库 Pages”**设计的。对于”私有源码仓库 → 公开 <username>.github.io 仓库”这种跨仓库发布场景,官方工作流并不适用,因此需要借助第三方 Action 完成跨仓库推送。
本文的仓库结构
| 仓库 | 可见性 | 用途 |
|---|---|---|
blog-hexo |
Private | 存放 Hexo 源码、文章、主题、配置 |
<username>.github.io |
Public | 接收构建产物,提供 GitHub Pages 服务 |
部署工具选型
跨仓库推送产物使用 peaceiris/actions-gh-pages@v4,这是跨仓库 GitHub Pages 部署场景下目前最成熟、最稳定的解决方案,原生支持跨仓库推送,无需手写 git 命令。
为什么不用单仓库方案?
在决定使用本文的双仓库方案之前,有必要先了解 GitHub 目前更推荐的单仓库方案,以及两者的适用边界。
GitHub 官方目前推荐的单仓库方案:
1 | 源码仓库(public) |
这套方案配置最简单,无需 PAT,无需跨仓库权限,是大多数个人博客的最优选择。
那什么情况下才需要双仓库?
对于个人博客而言,最常见的原因是:希望源码保持私有,同时继续使用免费的 GitHub Pages。
| 情况 | 推荐方案 |
|---|---|
| 源码可以公开,GitHub Free | ✅ 单仓库方案(官方推荐) |
| 源码需要私有,GitHub Pro/Team/Enterprise | ✅ 单仓库方案(private 仓库也可开启 Pages) |
| 源码需要私有,GitHub Free | ✅ 本文的双仓库方案 |
如果你的博客文章和配置没有保密需求,单仓库方案更简单,优先考虑。 双仓库方案的额外复杂度(PAT 管理、跨仓库权限、Token 到期维护)只在确实需要源码私有时才值得承担。
整体架构
1 | blog-hexo(private 源码仓库) |
第一步:创建 Fine-grained Personal Access Token
Actions 需要一个有写权限的 Token 才能向 <username>.github.io 仓库推送内容。推荐使用权限范围最小的 Fine-grained PAT,而非旧式的 Classic Token。
- 点击 GitHub 右上角头像 → Settings
- 左侧边栏滚动到底部,点击 Developer settings
- 选择 Personal access tokens → Fine-grained tokens
- 点击 Generate new token,填写配置:
- Token name:填写一个便于识别的名称,例如
hexo-deploy - Expiration:按需设置,建议选 1 年,到期后重新生成即可
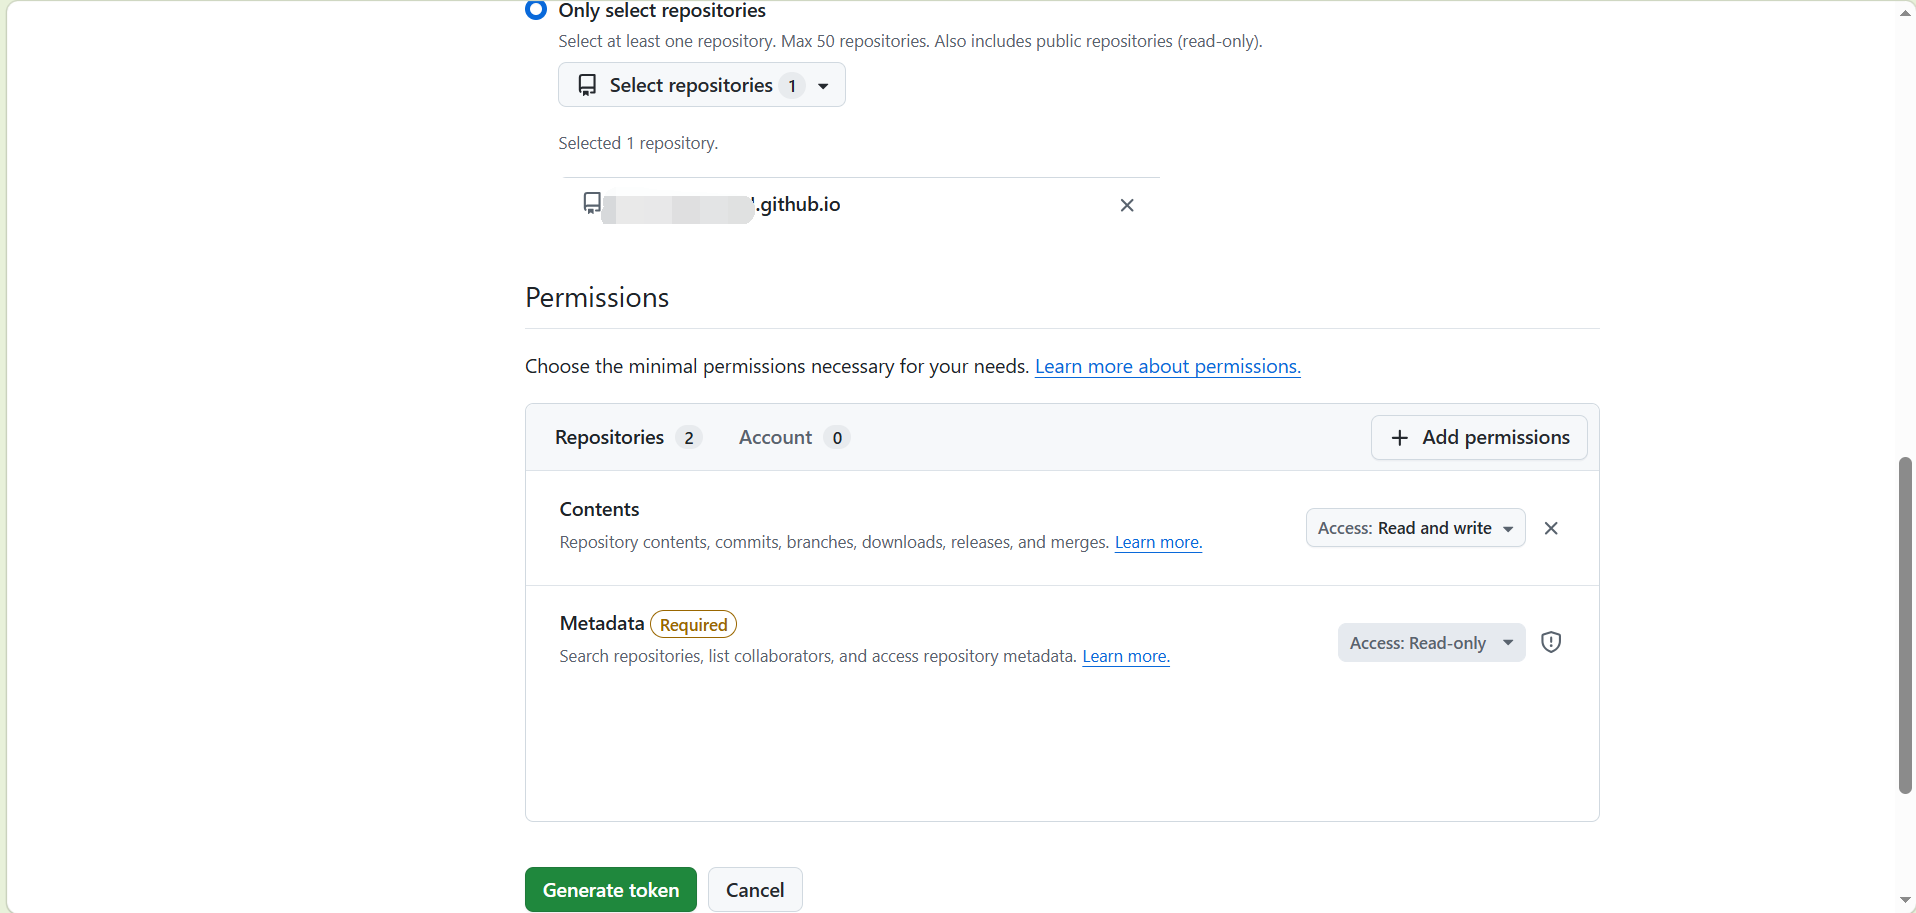
- Repository access:选择
Only select repositories,在下拉中勾选<username>.github.io - Repository permissions:找到
Contents,将权限改为Read and write
- Token name:填写一个便于识别的名称,例如
- 点击 Generate token,立即复制生成的 Token(页面离开后无法再查看)

第二步:将 Token 存入源码仓库的 Secrets
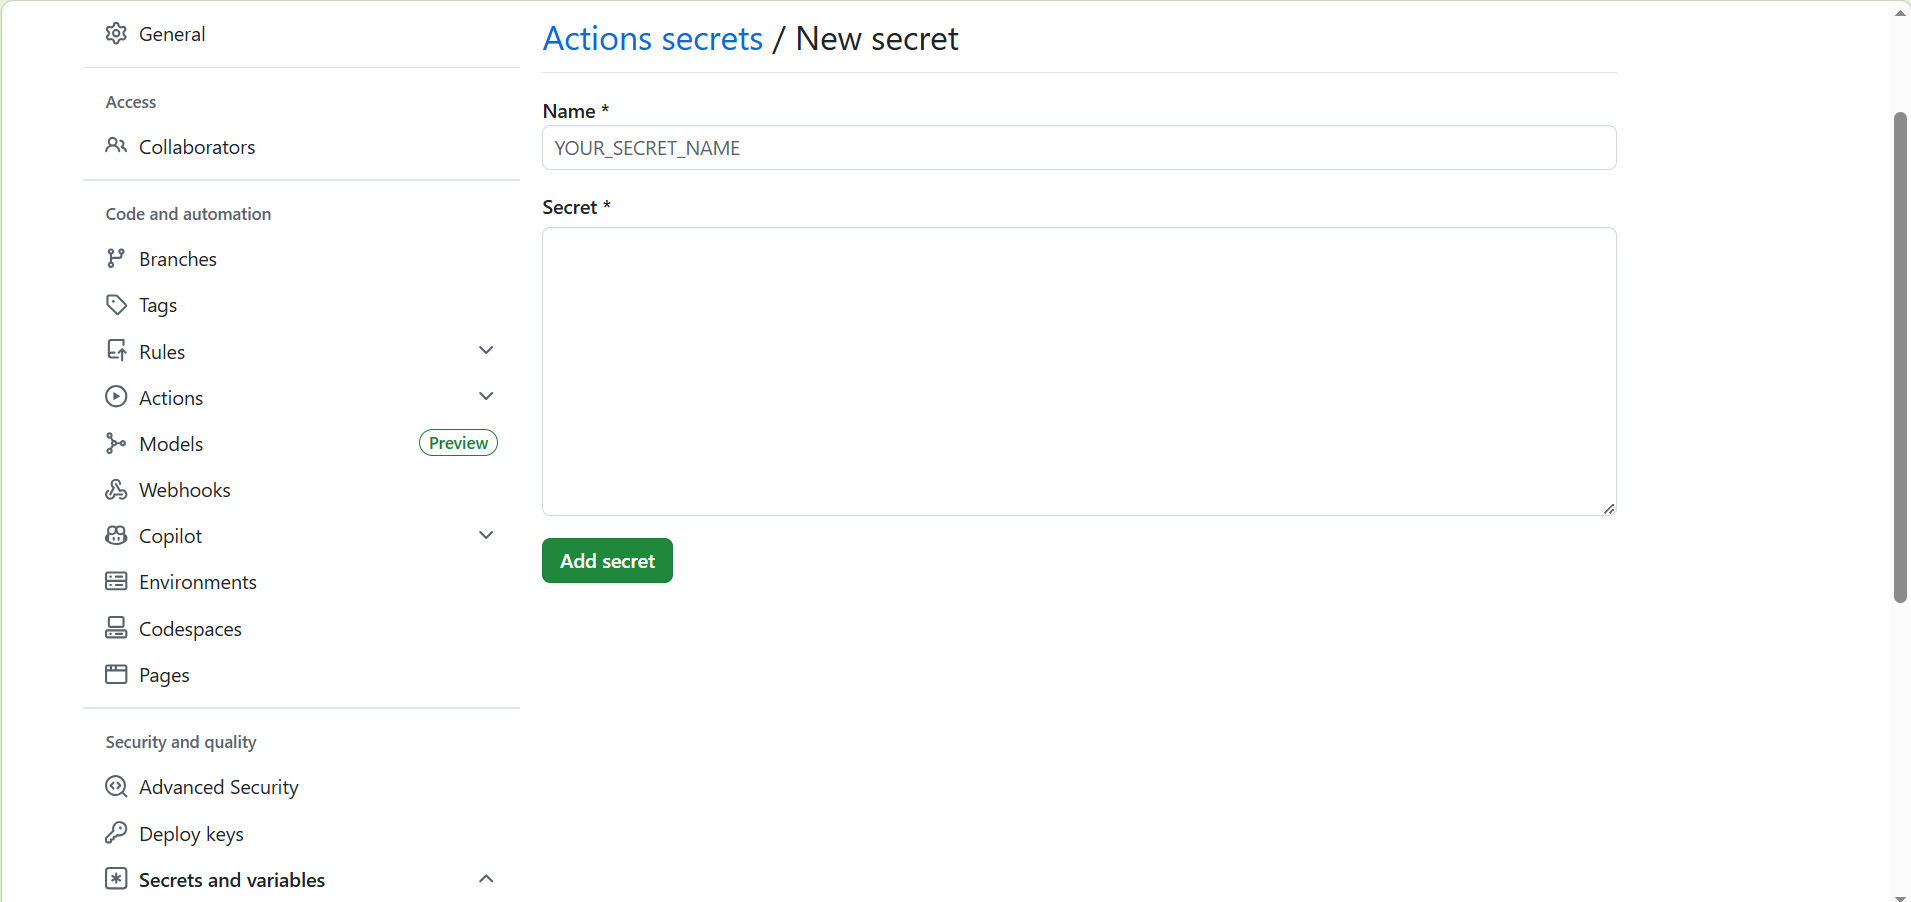
- 打开
blog-hexo仓库页面 - 点击顶部 Settings → 左侧 Secrets and variables → Actions
- 点击 New repository secret,填写:
- Name:
DEPLOY_TOKEN - Secret:粘贴第一步复制的 Token
- Name:
- 点击 Add secret 保存
Secret 一旦保存后无法再查看,只能重新生成替换。工作流通过
${{ secrets.DEPLOY_TOKEN }}引用它,Token 值不会出现在任何日志中。
第三步:确认 package.json 包含 build 脚本
打开 blog-hexo 根目录的 package.json,确认存在 build 脚本:
1 | { |
如果没有 build 字段,手动添加 "build": "hexo generate" 即可。
第四步:编写 GitHub Actions 工作流
在 blog-hexo 仓库根目录创建工作流文件:
1 | mkdir -p .github/workflows |
新建 .github/workflows/deploy.yml,写入以下内容:
1 | name: Deploy Hexo Blog |
使用前需修改的两处地方:
node-version:改为你本地的 Node.js 主版本号(运行node --version查看,取主版本号,如18、20)external_repository:改为你的实际部署仓库,格式为GitHub用户名/仓库名
第五步:确认部署仓库的 Pages 设置
打开 <username>.github.io 仓库 → Settings → Pages:
- Source 保持
Deploy from a branch - Branch 选择
main,目录选择/ (root) - 点击 Save
注意:这里不要改成
GitHub Actions。部署仓库自己不运行 Actions,它只是被动接收blog-hexo那边的 Actions 推过来的产物。

第六步:清理旧的 hexo-deployer-git 配置
注释掉 _config.yml 中的 deploy 配置,避免日后误执行 hexo d:
1 | # 已迁移至 GitHub Actions 自动部署,以下配置不再使用 |
关于是否卸载 hexo-deployer-git:
这是可选操作。如果你确定完全迁移到 GitHub Actions,不再需要 hexo d,可以卸载以保持依赖干净:
1 | npm uninstall hexo-deployer-git |
如果希望保留 hexo d 的能力(例如本地临时部署、测试或日后切换平台),则无需卸载,注释掉 _config.yml 中的配置已经足够防止误操作。
第七步:提交并触发首次部署
将所有改动提交并推送:
1 | git add . |
推送后:
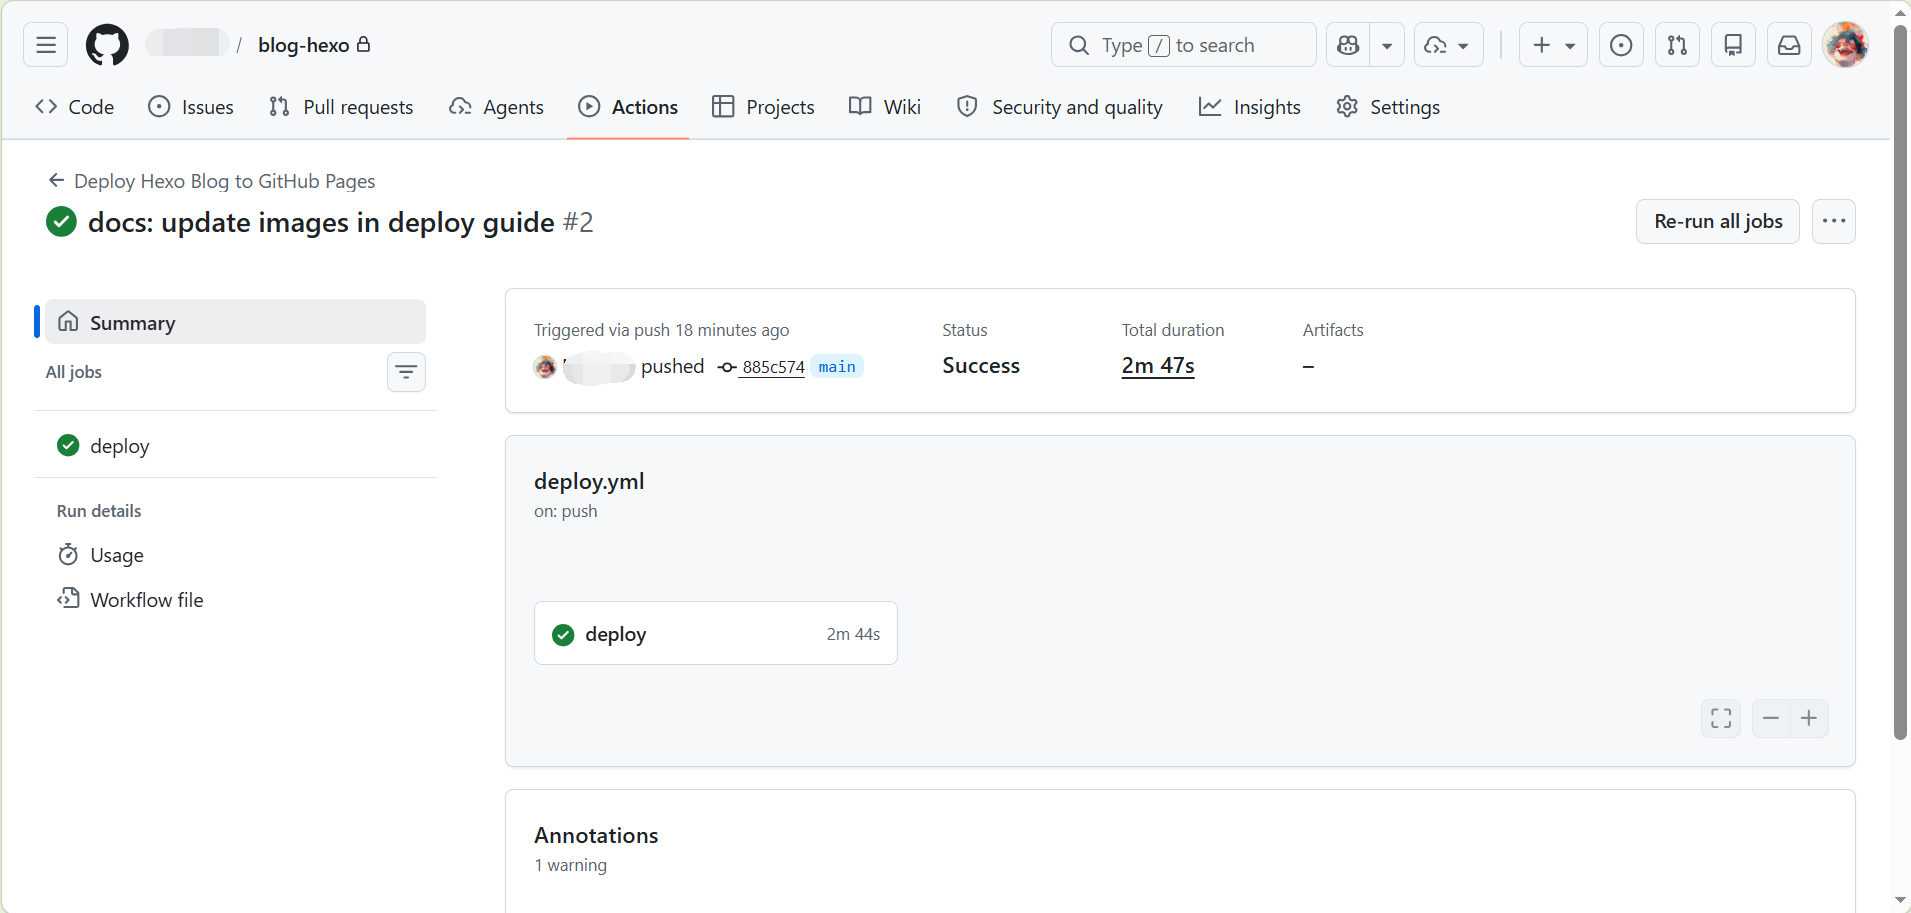
- 打开
blog-hexo仓库 → Actions 标签 - 找到正在运行的
Deploy Hexo Blog工作流,点击进入 - 观察各步骤执行情况,全部绿色即代表部署成功
首次部署完成后,访问 https://<username>.github.io 确认博客正常显示。
日常写作流程
迁移完成后,以后写文章只需三步:
1 | # 1. 新建文章 |
推送后通常几十秒到数分钟内文章自动上线(受 Actions 排队、Pages CDN 刷新、GitHub 负载等因素影响)。可以在 Actions 页面实时查看进度,部署失败时 GitHub 也会发送邮件通知。
工作流字段详解
| 字段 | 说明 |
|---|---|
on.push.branches: [main] |
只监听 main 分支的推送,其他分支不触发 |
workflow_dispatch |
允许在 Actions 页面手动一键触发,方便排查问题 |
submodules: recursive |
若主题通过 git submodule 管理则必须保留;若通过 npm 安装可删除 |
cache: "npm" |
缓存 npm 下载缓存目录(~/.npm),减少重复下载时间;注意缓存的是下载缓存而非 node_modules |
npm ci |
严格按 package-lock.json 安装,比 npm install 更稳定可复现;需要仓库中存在 package-lock.json |
personal_token |
使用存在 Secrets 中的 PAT,拥有目标仓库的写权限 |
external_repository |
跨仓库部署的目标,格式为 用户名/仓库名 |
publish_branch: main |
产物推送到目标仓库的 main 分支 |
publish_dir: ./public |
只推送 public/ 目录内容,不含源码 |
force_orphan: true |
每次部署创建全新的 orphan commit,不保留历史记录;删除此行可保留历史部署版本 |
常见问题排查
❌ Actions 报错:Error: Process completed with exit code 128(Deploy 步骤)
原因:DEPLOY_TOKEN 没有目标仓库的写权限,或 Token 已过期。
解决:重新生成 PAT,确认在 Fine-grained Token 设置中:
- Repository access 选中了
<username>.github.io - Contents 权限为
Read and write
然后在 blog-hexo 的 Secrets 中用新 Token 替换旧值。
❌ Actions 报错:npm ci 失败,提示 Missing package-lock.json
原因:package-lock.json 没有被提交到仓库,或被 .gitignore 排除。
解决:本地执行 npm install 生成锁文件,并提交:
1 | npm install |
❌ 部署成功,但博客样式/图片全部丢失(CSS/JS 404)
原因:_config.yml 中 url 或 root 配置有误。
解决:确认 _config.yml 中的配置正确:
1 | url: https://<username>.github.io |
修改后重新推送触发部署。
❌ 使用 git submodule 管理的主题没有被检出
原因:actions/checkout@v4 默认不拉取子模块。
解决:确认工作流中 checkout 步骤包含 submodules: recursive:
1 | - uses: actions/checkout@v4 |
❌ PAT 到期后部署失败
解决:在 GitHub 中重新生成一个新 Token(权限设置与之前相同),然后进入 blog-hexo 仓库的 Settings → Secrets → Actions,找到 DEPLOY_TOKEN,点击 Update 替换为新 Token。
❓ 想手动触发一次部署怎么办?
进入 blog-hexo 仓库 → Actions → 左侧选择 Deploy Hexo Blog → 右侧点击 Run workflow → 选择 main 分支 → 点击绿色 Run workflow 按钮。
❓ Actions 显示成功,但网站内容没有更新?
这是高频问题,通常不是部署出了问题,按以下顺序排查:
- 确认 Actions 真的成功:进入 Actions 页面,确认 deploy job 显示绿色勾,而非黄色(仍在运行)
- 等待 Pages CDN 刷新:GitHub Pages 有 CDN 缓存,部署完成后可能需要额外几分钟才能在全球节点生效
- 强制刷新浏览器:按
Ctrl + F5(Windows/Linux)或Cmd + Shift + R(macOS)绕过本地浏览器缓存 - 用隐私模式访问:打开无痕窗口访问博客地址,排除浏览器缓存干扰
总结
迁移完成后,新旧方案对比如下:
旧方案(hexo d) |
新方案(GitHub Actions) | |
|---|---|---|
| 构建位置 | 本地机器 | GitHub Runner(云端) |
| 部署触发 | 手动执行命令 | git push 自动触发 |
| 部署日志 | 本地终端,无持久记录 | Actions 页面完整日志 |
| 部署失败通知 | 无 | GitHub 邮件通知 |
| SSH Key 管理 | 需要配置并维护 | 不需要 |
| 本地环境依赖 | 必须安装 Node.js 和 Hexo | 本地无需构建环境 |
参考资料: